Most of the developers in the Microsoft platform uses C# as their programming language. C# is now matured to version 6 and has come with new features in its different versions. As a programmer, we should know all these features. This will not only help you in cracking interviews but also help you decide whether you should upgrade your project to latest.

“Duck Typing” is not a common interview question but one of the interviewer in a panel may ask you this just to check your knowledge out of the common questionnaire. You might be already answered this in a different question but stucked here.
So, what is this “Duck Typing” and how this benefits a C# developer? Ok, let’s start discussing this in today’s blog post and I assume, you will find it interesting.

C# is not new to us. We are using it since Visual Studio 2002. Currently it is in released version 4.0 and C# 5.0 is on the way to release with Visual Studio 2012. Though we are using it since a long time, but many of us don’t know the new features that has been introduced in each new release.
This post will cover the “Evolution of C#” from version 1.0 to version 5.0 along with the new features and respective Visual Studio version. Bookmark this post for future reference and share it to your network and help others to know.
Visual Studio Async CTP Service Pack 1 has been released which extends Visual Studio 2010 which provides a new streamlined syntax for Asynchronous development. This version of Async CTP is compatible with Visual Studio 2010 SP1.
Read the complete post to find out the download link and installation instructions.
 Few days ago, in one my earlier post, I listed “Some Best Practices for C# Application Development” from my past few years experience, which got a huge hit by my readers. I got several feedbacks on that too. Many of my readers gave valued suggestions too.
In this article, I will discuss most of those points. I will keep this article regularly updated with new best coding practices. Hope, I will get more feedbacks and/or suggestions here too.
 Few days ago, in one my earlier post, I discussed about “Some Best Practices for Silverlight Application Development (XAML)” which got a huge hit by my readers. I got several feedbacks on that too. Someone from the community also suggested me to write some best coding practices on C#. This stroke my mind and hence decided to write some best practices about C# coding here from my past few years of experience.
For past few years, I learned a lot and tried to share best of them to the others who are new in the software development field. This post I contribute to those fellow members. Hope, I will get more feedbacks and/or suggestions here too.
In my last two articles on MEF i.e. “First Guide to MEF & Silverlight (Part - I)” and “First Guide to MEF & Silverlight (Part - II)” I described about the framework with the help of a Console Application and a Silverlight Application. Hope that gave you basic idea on it and what this MEF does.
In this article I will try to give you more knowledge on MEF & it’s benefit. This time, I will again use a Console Application which will give more visibility to the underlying scenarios. Hope, like the previous articles this will also help you to understand the framework better to use it in your future need.
In my previous article “First Guide to MEF & Silverlight (Part–I)” I discussed about MEF with a small simple console application. Hope that was useful to you to understand the basic knowledge of MEF. In this article, I will guide you to create a simple Silverlight application using the MEF. If you are new to MEF, I strongly recommend you to read my previous article to gain knowledge on the basic things of MEF like Importing, Exporting, Catalog, Container etc.
Read the complete article and at the end if you have any queries, please let me know. I will try to answer them as soon as possible. Always Appreciate your valuable feedbacks.
MEF is a framework to extend your application and was introduced in .Net Framework 4.0 and Silverlight 4.0. Recently I got a chance to look around the MEF with Silverlight. I found it useful in various scenarios and thus thought to do something with MEF in Silverlight.
In this article I will first discuss little about the MEF framework to give you some basic knowledge on it and then will show you how to create a small HelloMEFWorld console application step-by-step. In the next article I will use it in a Silverlight application & showcase you the feature and functionality. Read through the whole article and use this extender in your application if you need. Don’t forget to share your feedbacks and suggestions as this helps me improve my articles in greater details and present more to you.
Several times we need to sort a collection based on some property name e.g. we have an Employee collection of type Person. Person consists of EmpId, Name, Age etc. Now as an user, I need to sort the collection in ascending or descending order either by EmpId, Name or Age. So, how can I do this?
In this post, I will describe you a simple technique by which you will be easily able to sort the collection without writing the implementation for each logic. Read the complete article and at the end if you have any suggestions, please don’t forget to share. Feedbacks are always highly appreciated.
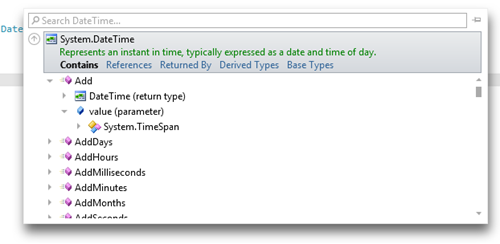
Visual Studio 2010 Productivity Power Tool is a set of extensions for Visual Studio 2010 Professional and above versions which actually improves productivity of developers. In this Tips & Trick, I will show you one nice extension behavior named “Interactive Tooltip”, which will make your development life easier.

If you didn’t install it till now, you can download it from Visual Studio Gallery. You can also download it directly from here. Read the complete post to know about it more.
Here I will demonstrate by creating a small application like Windows Explorer and reading all your drives and their contents in the screen like below screenshot:

You will be able to open the drive and browse through it’s contents (subfolders and files). Interesting? So, read it out and learn Silverlight 4 a bit more. Don’t forget to leave your comments at the end.
Silverlight 4 has the capability of accessing the COM object using the COM API. You can access any program installed in your PC using those APIs in Silverlight. You can open Notepad, Word, Excel or Outlook from Silverlight application.
Here I will demonstrate you the step-by-step tutorial on opening an Microsoft Excel book followed by data sharing between the Silverlight application and the Excel Sheet. Here we will use a DataGrid which will load some customer information. Then we will pass the data to the Excel Sheet and then we will modify the data in the external application (i.e. inside the Excel sheet). You will see that, the modified data will reflect automatically to the Silverlight Application.
In this post I will talk for one of the new feature in C# 4.0 – Named and Optional Parameter. Actually these are not a single feature but two different feature. You can get more benefit if you work with them together. So, what are those? Named parameter is a way to provide an parameter to the method using the name of the corresponding parameter instead of its position in the parameter list. Whereas, optional parameter allows you to omit arguments to member invocation.