You all know that, Silverlight 4 has the feature to talk with COM APIs. In my earlier posts I already mentioned various Interoperability functionalities of Silverlight. You can see some articles in my Blog. In this article, I will show you how Silverlight can read your local files, folders and drives. At the end of this Article you will be able to open any file/folder/drive and read their attributes.
Here I will demonstrate by creating a small application like Windows Explorer and reading all your drives and their contents in the screen like below screenshot:

You will be able to open the drive and browse through it’s contents (subfolders and files). Interesting? So, read it out and learn Silverlight 4 a bit more. Don’t forget to leave your comments at the end.
Table of Contents
- Background
- Basic knowledge on the API
- Prerequisite
- Setting up Project
- Configure Application for Out-of-Browser Support
- Configure Application for “dynamic” keyword Support
- Play with the XAML
- Create the basic UI
- Create the Template for drive selector
- Create the Template for folder browser
- Implementing Code
- Create the basic classes
- Create Dependency Properties
- Implementing GetDriveInfo() method
- Implementing GetFolders() method
- Implementing GetFiles() method
- Integration of API calls to the page
- What Next?
- Download
- End Note
Background
Earlier to Silverlight 4, we are able to only get file access to some of the location of your Windows Operating System like My Documents. In new version of Silverlight i.e. in Silverlight 4 you can able to access any files and/or folders. Not only this, you can able to get information of any drive, files and folders. Though there is a restriction to run the Silverlight application in Out-of-Browser mode, but it actually benefited for those who want to run it outside browser.
Accessing your local drive, files and folders are achievable using the COM Interoperability which Silverlight 4 supports. Using the COM API call you can get all the drives attached to your PC, read the Drive Information i.e. total size, free space etc., read the files, folders and subfolders of any drive, run any application or file, do a copy/move/delete/rename operation on any file, folder or drive.
Here in this article we will see some of the operations like reading your local drive, files and folders and displaying them inside the Silverlight OOB Application.
Basic Knowledge on the API
Let us first discuss about the basic API functionalities require to develop this application. To do this, we need to create the object of “Scripting.FileSystemObject” from the “AutomationFactory”. It has several properties and methods to read files, folders and drives information from your local PC.
Lets discuss a little bit about the API objects and their methods here:
- “Drives” property – It returns you the collection of the drives available to the system. It consists of a collection of “Drive” object.
- “Drive” object – It allows you to get the informations about the drive available to the system, either physical or logical network share. It consists of several properties:
- DriveLetter – Returns the assigned drive letter of the drive (e.g. ‘C’, ‘D’ etc.)
- VolumeName –Returns the volume label of the drive. It generally set by the user of the computer. You can name your drives logically from the property dialog of the drive.
- TotalSize – Returns the capacity of the drive in bytes.
- AvailableSpace – Returns the free space of the drive in bytes
- FreeSpace – Same as AvailableSpace
- SerialNumber – It returns the serial number of the drive
- Path – Returns the path of the drive
- FileSystem – It returns the filesystem of the drive i.e. whether it is a FAT, FAT32 or NTFS drive system.
- DriveType – It returns the type of the Drive i.e. Fixed, Removal, CD-ROM etc.
- GetFolder() method – It returns the folder object for the specified path passed as a parameter to it.
- CreateFolder() method – It created a folder to the specified path
- DeleteFolder() method – It deletes the specified folder
- MoveFolder() method – It moves a folder from a specific position to a different location.
- CopyFolder() method – Create a copy of the folder to a new location.
- “Folder” object – It returns you the folder instance
- Name – Returns the name of the folder
- Path – Returns you the path of the specified folder
- Size – Returns the total size of the folder in bytes
- DateCreated – Returns you the first creation date of the folder
- DateLastAccessed – Returns the last accessed date of the folder
- DateLastModified – Returns the last modified timestamp
- “SubFolders” property – Returns you the collection of folders for that specified path
- “Files” property – Returns you the collection of the files for that specified path
- “File” object – It returns you the typical instance of the file.
- Name – Returns you the name of the file
- Path – Returns full path of the file
- Type – It returns the type of the file
- DateCreated – Returns first creation date of the file
- Size – Returns you the size of the file in bytes
- DateLastAccessed – Returns the last accessed timestamp
- DateLastModified – Returns last modified date
You can find some good links in Microsoft MSDN site on the API. Read those properly and you will get the knowledge about each one of them. Here are some links for your reference:
Prerequisite
Here are the prerequisite for starting with the project:
- Visual Studio 2010
- Silverlight Tools for Visual Studio 2010
- Expression Blend 4 (optional, if you are comfortable to do UI design with Blend)
Setting up Project
Once you set up your development environment, create a Silverlight project. If you are new to Silverlight application development and want to know about Silverlight and want to learn how to create a new Silverlight application in-depth, read the Silverlight Tutorial.
- Open your Visual Studio 2010 IDE
- Select File > New Project or just press CTRL + SHIFT + N to open up the New Project dialog
- Expand the “Visual C#” node and then go to sub node “Silverlight”
- Select “Silverlight Application” in the right pane
- Select proper location to store your application (let’s say, “D:\Sample Apps\”
- Now enter a proper name for your project (call it as: SilverlightApps.FileExplorer)
- Select the .Net Framework version from the combo box at the top (I am using .Net Framework 4.0 by default as I am using Visual Studio 2010) and click OK
- In the next dialog make sure that “Host the Silverlight application in a new Web site” option is selected
- Choose “Silverlight 4” as the Silverlight Version and hit OK
Now, your Silverlight project is ready.  Wait a minute. It’s just 40% done. We need to configure some settings in order to develop the COM Interoperability. First of all, the COM Interoperability works on Trusted Silverlight Out-of-Browser application. Hence, we have to setup it first. Then we need to use “dynamic” keyword, which is part of “Microsoft.CSharp” assembly. So, we have to add the reference of that. Let us start doing those.
Configure Application for Out-of-Browser Support
Before doing anything, you need to set up some configuration. Yes, because the COM API only works in Silverlight Out-of-Browser application, you need to change the project settings for that.
- Right click on the Silverlight project and open the Properties.
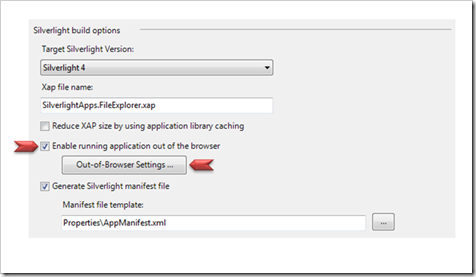
- Click the CheckBox “Enable running application out of the browser” as shown below and then click on the “Out-of-Browser Settings” button.
- Once the Settings page has been open, set the desired options from the screen. Be sure that, you checked “Show install menu” and “Require elevated trust when running outside the browser”.
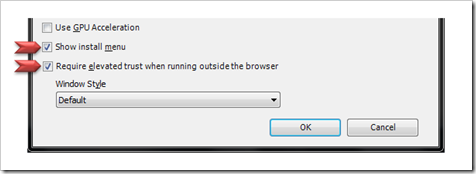
- Once you done with this settings, you will be able to install this web version as an Out-of-Browser application.
Configure Application for “dynamic” keyword support
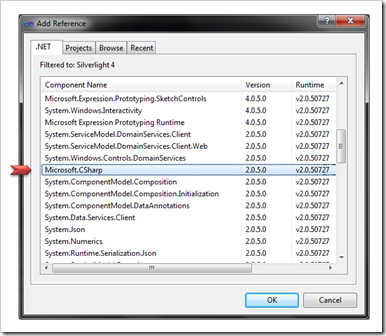
Now you have to add a DLL assembly reference to your project. As we will use dynamic keyword in our example and hence we need to add the “Microsoft.CSharp” assembly reference.
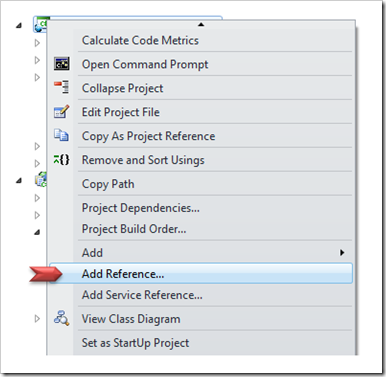
- To do this, right click on the Silverlight project and chose “Add Reference” from the menu.
- Now from the “Add Reference” dialog find the “Microsoft.CSharp”, select it and click Ok. This will add the assembly reference to the project.
Play with the XAML
Now our development environment is ready. Also, the project has been created and well configured for OOB and dynamic keyword support. Now it is time to do some UI design. You can use both Visual Studio 2010 and Expression Blend 4 to design your UI screens. If you are comfortable using Expression Blend then start working with that. I will show you the XAML code here. Hence, I will use Visual Studio 2010.
Before going to deep, let us discuss what we want to do. We want to design a FileExplorer using Silverlight 4. Let’s take an example of default Windows Explorer. When you open your Windows Explorer you see your drives organised in the screen. When you double click on them, they open up the file/folder list and you can able to browse through the subfolders of each folder.

Create the basic UI
Let us start creating the basic UI for our application. I am telling it basic because, I don’t want to create the full staff of Windows Explorer here but will create that much which is require for you to understand the logic behind it.
In our example there will be two different ListBox; one will show you all the drives as shown in Windows Explorer and the other will list out the folders and files present inside the drives or any subfolder.
First of all, we will split the Grid into two column. The first column will hold the ListBox with the Drives and the other ListBox in the second column will hold files and folders. Lets position the ListBoxes properly in the xaml page. Once you add two ListBox in your MainPage.xaml it will look like below:
<Grid x:Name="LayoutRoot" Background="White">
<Grid.ColumnDefinitions>
<ColumnDefinition Width="Auto" />
<ColumnDefinition Width="*" />
</Grid.ColumnDefinitions>
<ListBox HorizontalAlignment="Left" VerticalAlignment="Top"
BorderBrush="Transparent" BorderThickness="0"
Background="Transparent" Grid.Column="0">

</ListBox>

<ListBox HorizontalAlignment="Stretch" VerticalAlignment="Top"
BorderBrush="Transparent" BorderThickness="0"
Background="Transparent" Grid.Column="1">

</ListBox>
</Grid>
We are done with creating the basic UI for the page having two ListBoxes. Now it comes to design the template for the ListBox to hold the data as controls. We need to set the ItemTemplate and DataTemplate for each ListBox so that, we can bind our data properly as ItemSource to the ListBox and it will handle everything. Lets start doing that.
Create the Template for drive selector
First we need to create the control template for our drives. We will give the same look we see when we browse to the Windows Explorer. Ahh!!!  Confused??? Yes, as mentioned in the previous snapshot we will create the UI for each drive. Have a look into the control that we want to build:
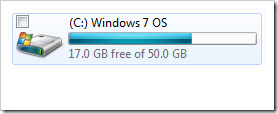
Yes, our control will look like the above picture. Not fully but partially. In our control there will be the Volume Name and Drive Letter at the top line, followed by a progress bar showing the total size and available free space in the middle. The third line will show the Total Space and available free space in text.
We will not create a separate control or usercontrol for it, but will add it directly into the ListBox as DataTemplate. So, can we proceed to the next to create the GUI? Yup.
First, we will set the ItemsPanel for the ListBox. It will be a StackPanel in Verticle Orientation. In our example, we will load our items in vertical manner instead or showing them horizontally. If you want to some exploration, you can set it here as Horizontal too.
<ListBox.ItemsPanel>
<ItemsPanelTemplate>
<StackPanel Orientation="Vertical" />
</ItemsPanelTemplate>
</ListBox.ItemsPanel>
Now we will create the DataTemplate for the Drives. Lets begin with a Grid having three Rows for each line as mentioned in the snapshot.We will add a Gradient background to the Grid using the Border control in the first Row spanning it to three Rows so that, it will cover the full Grid.
<ListBox.ItemTemplate>
<DataTemplate>
<Grid Cursor="Hand" Width="225" Height="63" Margin="5">
<Grid.RowDefinitions>
<RowDefinition Height="0.3*" />
<RowDefinition Height="0.4*" />
<RowDefinition Height="0.3*" />
</Grid.RowDefinitions>
<Border x:Name="brdBackground" BorderThickness="1" CornerRadius="5"
Grid.RowSpan="3" BorderBrush="#FF80D4FA">
<Border.Effect>
<DropShadowEffect />
</Border.Effect>
<Border.Background>
<LinearGradientBrush EndPoint="1,0.5" StartPoint="0,0.5">
<GradientStop Color="White" Offset="0.244" />
<GradientStop Offset="0.738" Color="#19FFFFFF" />
<GradientStop Color="Transparent" Offset="1" />
</LinearGradientBrush>
</Border.Background>
</Border>

</Grid>
</DataTemplate>
</ListBox.ItemTemplate>
Now we will add a TextBlock in the first Row and will bind the value of Text property to DeviceName. Later we will create a Property from code behind to populate it here. As design perspective I am not discussing the code behind logic here. Just setting each attribute value to the UI.
<TextBlock Text="{Binding DriveName}" Grid.Row="0" FontWeight="Bold"
VerticalAlignment="Center" Margin="5" />
Next comes the ProgressBar indicator to show the TotalSpace and the FreeSpace of your Drive. Bind it’s Maximum value to “TotalSpace” and Value property to “UsedSpace” as shown in the below code:
<ProgressBar Maximum="{Binding TotalSpace}" Value="{Binding UsedSpace}"
Margin="5" Grid.Row="1" HorizontalAlignment="Stretch"
Foreground="Blue" Background="White" Height="15"
VerticalAlignment="Center" />
Add another TextBlock, but this time add it in the third Row and set it’s Text property to “SpaceIndicator”. See the code below:
<TextBlock Text="{Binding SpaceIndicator}" Grid.Row="2"
VerticalAlignment="Center" Margin="5" />
Now we will set the ItemSource and SelectedItem of the ListBox. Assume we will create an Collection at the backend to store the drives collection. We will bind that collection over here. We will name it as “DriveCollection”. We have to bind the SelectedItem and we will name it as “SelectedDrive”.
Here is the full XAML code for the DriveSelector ListBox:
<ListBox ItemsSource="{Binding DriveCollection, ElementName=userControl}"
HorizontalAlignment="Left" VerticalAlignment="Top" BorderBrush="Transparent"
BorderThickness="0" Background="Transparent" Grid.Column="0"
SelectedItem="{Binding SelectedDrive, ElementName=userControl, Mode=TwoWay}">
<ListBox.ItemsPanel>
<ItemsPanelTemplate>
<StackPanel Orientation="Vertical" />
</ItemsPanelTemplate>
</ListBox.ItemsPanel>
<ListBox.ItemTemplate>
<DataTemplate>
<Grid Cursor="Hand" Width="225" Height="63" Margin="5">
<Grid.RowDefinitions>
<RowDefinition Height="0.3*" />
<RowDefinition Height="0.4*" />
<RowDefinition Height="0.3*" />
</Grid.RowDefinitions>
<Border x:Name="brdBackground" BorderThickness="1" CornerRadius="5"
Grid.RowSpan="3" BorderBrush="#FF80D4FA">
<Border.Effect>
<DropShadowEffect />
</Border.Effect>
<Border.Background>
<LinearGradientBrush EndPoint="1,0.5" StartPoint="0,0.5">
<GradientStop Color="White" Offset="0.244" />
<GradientStop Offset="0.738" Color="#19FFFFFF" />
<GradientStop Color="Transparent" Offset="1" />
</LinearGradientBrush>
</Border.Background>
</Border>
<TextBlock Text="{Binding DriveName}" Grid.Row="0" FontWeight="Bold"
VerticalAlignment="Center" Margin="5" />
<ProgressBar Maximum="{Binding TotalSpace}" Value="{Binding UsedSpace}"
Margin="5" Grid.Row="1" HorizontalAlignment="Stretch"
Foreground="Blue" Background="White" Height="15"
VerticalAlignment="Center" />
<TextBlock Text="{Binding SpaceIndicator}" Grid.Row="2"
VerticalAlignment="Center" Margin="5" />
</Grid>
</DataTemplate>
</ListBox.ItemTemplate>
</ListBox>
As our UI is ready for the DriveSelector and you want to see it live you will hit “Run” to build the project and execute the application.  One Minute. It will not work as we didn’t write any backend code for it. Also, the collections and properties which we bound to the UI controls are not there. So, keep a bit patient. Before starting with the C# code, we will design the folder browser too at the second column of the Grid.
Create the Template for folder browser
Lets start creating the Template for the folder browser. Folder browser? Yeah, this is the second ListBox that we added to the second column of the Grid. We will load the files and folder of the selected drive here. Also we will load the files and subfolders of the selected folder in this ListBox.
First we will add the ItemsPanel for the ListBox as we did for the Folder ListBox. We will use “Vertical” as the Orientation. Don’t use “Horizontal” here, as it will hamper the screen UI because there may be so many folders in your PC and that occurs a long Horizontal Scrollbar to scroll to the end. Here is the XAML code for it:
<ListBox.ItemsPanel>
<ItemsPanelTemplate>
<StackPanel Orientation="Vertical" HorizontalAlignment="Stretch"/>
</ItemsPanelTemplate>
</ListBox.ItemsPanel>
Now we will add the ItemTemplate for the ListBox. We will show type of content i.e. whether the content is a folder type or file type. And also, we will show the name of the file/folder there. For this, we need to TextBlock as a DataTemplate to the ListBox. Add the two TextBlocks wrapped by a Grid. Don’t forget to split the Grid in two Columns. We will add the type of the content in the first column and the name of the content i.e. the name of the file/folder to the second column.
Assuming the name of the property to hold the type of the content we will bind the first TextBlock’s Text to “DriveContentType” and the second TextBlock’s Text to “DriveContentName”. Here is the XAML code for your reference:
<ListBox.ItemTemplate>
<DataTemplate>
<Grid Cursor="Hand">
<Grid.ColumnDefinitions>
<ColumnDefinition Width="*" />
<ColumnDefinition Width="Auto" />
</Grid.ColumnDefinitions>
<TextBlock Text="{Binding DriveContentType}" VerticalAlignment="Center"
Grid.Column="0" Width="80" />
<TextBlock Text="{Binding DriveContentName}" VerticalAlignment="Center"
Grid.Column="1" />
</Grid>
</DataTemplate>
</ListBox.ItemTemplate>
Now, we need to set the ItemSource and the SelectedItem property of the ListBox. Assuming the name of the collection to the drive contents as “DriveContents” we will bind the ItemSource of the ListBox to “DriveContents”. Also, we will bind the SelectedItem property of the ListBox to “SelectedDriveContent”. As of now, our XAML code is fully ready.
Here is the full XAML code for the drive’s content ListBox:
<ListBox ItemsSource="{Binding DriveContents, ElementName=userControl}"
HorizontalAlignment="Stretch" VerticalAlignment="Top" BorderBrush="Transparent"
BorderThickness="0" Background="Transparent" Grid.Column="1"
SelectedItem="{Binding SelectedDriveContent, ElementName=userControl, Mode=TwoWay}">
<ListBox.ItemsPanel>
<ItemsPanelTemplate>
<StackPanel Orientation="Vertical" HorizontalAlignment="Stretch"/>
</ItemsPanelTemplate>
</ListBox.ItemsPanel>
<ListBox.ItemTemplate>
<DataTemplate>
<Grid Cursor="Hand">
<Grid.ColumnDefinitions>
<ColumnDefinition Width="*" />
<ColumnDefinition Width="Auto" />
</Grid.ColumnDefinitions>
<TextBlock Text="{Binding DriveContentType}" VerticalAlignment="Center"
Grid.Column="0" Width="80" />
<TextBlock Text="{Binding DriveContentName}" VerticalAlignment="Center"
Grid.Column="1" />
</Grid>
</DataTemplate>
</ListBox.ItemTemplate>
</ListBox>
Implementing Code
As of now, we are done with the XAML design. It is time to start playing with the C# code. I will discuss about this implementation in 5 steps. First we will start with creating the basic classes to store the information. Then we will discuss about Dependency Properties required for our application. And then implementation of the GetDriveInfo(), GetFolders() and GetFiles() method to retrieve the data using the COM object and storing into the appropriate properties to reflect the UI.
Create the basic classes
Here we will create the basic classes require for the data binding with the ListBox. We need to store the value for the Drive informations, also we need to store the value for the files and folders informations. To do this, we will create two classes with some properties inside them.
Let’s start with the Drive class. We need some public properties. Here I will describe about each properties.
First we will create a property named “VolumeName”. This will store the volume name of the partition i.e. the logical drive. It will just have simple getter and setter inside it.
public string VolumeName { get; set; }
Create another property to store the Drive letter, name it as “DriveLetter”. This will be useful while retrieving the folders list for the drive. Just put a simple getter and setter like VolumeName.
public dynamic DriveLetter { get; set; }
We need to show both the VolumeName and the DriveLetter in a single line as diagrammed in the earlier photo like Windows Explorer. While designing the XAML we put a single TextBlock to show the first Row. Hence we need to create a getter property which will combine both the VolumeName and the DriveLetter as a single text. Hence, the code:
public string DriveName
{
     get { return string.Format("{0} ({1}:)", VolumeName, DriveLetter); }
}
Now, we need to show the TotalSpace and FreeSpace in the Progress bar. Hence create two more double property with getters and setters. While setting the value, we will divide the original value with the driveSpaceCoFactor which is a cubic of 1024. This actually converts the bytes value (B) of space to a GigaBytes value (GB). Here is the code of the same:
private double m_TotalSpace;
public double TotalSpace
{
get { return m_TotalSpace; }
set
{
m_TotalSpace = (Convert.ToDouble(value) / driveSpaceCoFactor);
}
}

private double m_FreeSpace;
public double FreeSpace
{
get { return m_FreeSpace; }
set
{
m_FreeSpace = (Convert.ToDouble(value) / driveSpaceCoFactor);
}
}
Create two more property named “UsedSpace” and “SpaceIndicator” having only getter values. UsedSpace will subtract the available freespace from the total space value. Whereas, the SpaceIndicator property will return you the concatenated text to show in the third row of the device control.
public double UsedSpace
{
get { return TotalSpace - FreeSpace; }
}

public string SpaceIndicator
{
get { return string.Format("{0:0.0} GB free of {1:0.0} GB", FreeSpace, TotalSpace); }
}
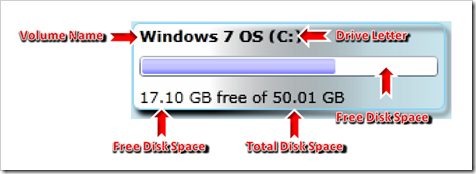
The below snapshot will describe you exactly the same thing we want to achieve. DriveName will return you the concatenated string of VolumeName and DriveLetter as shown in the first line. In the second line, it will set the TotalSpace as the maximum value of the ProgressBar and UsedSpace which is again the subtracted value of TotalSpace and FreeSpace to the current value of the ProgressBar. In the third line we will see the SpaceIndicator to show the full string of how much space available for the total size. We used the same name here to create the properties as we binded in the DataTemplate of the drive ListBox in the XAML file.
Now we will create another class named “DriveContent”. This will store information about folders and files. Create three simple properties named “DriveContentName”, “DriveContentType” and “Path” having getters and setters.
public string DriveContentName { get; set; }
public string DriveContentType { get; set; }
public string Path { get; set; }
DriveContentName will hold the name of the file or folder. DriveContentType will hold the string value to check whether the content is a file or a folder. We will use “File” and “Folder” respectively to differentiate between two types of contents. Path will be used to get the complete path of the file and/or folder. This will be require again when we will traverse through the subfolders. If we need to open any file we can use the complete path of the file to execute the shell command.
Create Dependency Properties
It’s time to create the Dependency Properties for the collections and selected item. As we binded it there in the UI, we need to have it set in the code. Open your MainPage.xaml.cs and start working on them. We need to create two collection properties of type ObservableCollection<T>. One will be use for Drive and the another for DriveContent. Name them as “DriveCollection” and “DriveContents”. Do you remember that, we used the same name while binding the ItemSource of the ListBoxes? Yes, those are these collections. Once you wrote code for the collections, it will look as below:
public ObservableCollection<Drive> DriveCollection
{
get { return (ObservableCollection<Drive>)GetValue(DriveCollectionProperty); }
set { SetValue(DriveCollectionProperty, value); }
}

public static readonly DependencyProperty DriveCollectionProperty =
DependencyProperty.Register("DriveCollection",
typeof(ObservableCollection<Drive>),
typeof(MainPage),
new PropertyMetadata(new ObservableCollection<Drive>()));

public ObservableCollection<DriveContent> DriveContents
{
get { return (ObservableCollection<DriveContent>)GetValue(DriveContentsProperty); }
set { SetValue(DriveContentsProperty, value); }
}

public static readonly DependencyProperty DriveContentsProperty =
DependencyProperty.Register("DriveContents",
typeof(ObservableCollection<DriveContent>),
typeof(MainPage),
new PropertyMetadata(new ObservableCollection<DriveContent>()));
Now, we need to create two more Depepndency Properties named “SelectedDrive” and “SelectedDriveContent” which we used at the time of binding the SelectedItem property of the two ListBox. This time we will use some tricks while creating the Dependency Properties. Some place we purposefully use as blank. Later once our methods are ready, we will integrate them there. Below code desribes about the two properties:
#region Selected Drive Dependency Property
public Drive SelectedDrive
{
get { return (Drive)GetValue(SelectedDriveProperty); }
set { SetValue(SelectedDriveProperty, value); }
}

public static readonly DependencyProperty SelectedDriveProperty =
DependencyProperty.Register("SelectedDrive",
typeof(Drive),
typeof(MainPage),
new PropertyMetadata(null, DriveSelectionChanged));

public static void DriveSelectionChanged(DependencyObject dependencyObject,
DependencyPropertyChangedEventArgs e)
{
MainPage obj = dependencyObject as MainPage;
Drive currentDrive = e.NewValue as Drive;
obj.OnDriveSelectionChange(currentDrive);
}

private void OnDriveSelectionChange(Drive currentDrive)
{

}
#endregion

#region Selected Drive Content Dependency Property
public DriveContent SelectedDriveContent
{
get { return (DriveContent)GetValue(SelectedDriveContentProperty); }
set { SetValue(SelectedDriveContentProperty, value); }
}

public static readonly DependencyProperty SelectedDriveContentProperty =
DependencyProperty.Register("SelectedDriveContent",
typeof(DriveContent),
typeof(MainPage),
new PropertyMetadata(null, DriveContentSelectionChanged));

public static void DriveContentSelectionChanged(DependencyObject dependencyObject,
DependencyPropertyChangedEventArgs e)
{
MainPage obj = dependencyObject as MainPage;
DriveContent currentSelection = e.NewValue as DriveContent;

if (currentSelection.DriveContentType.Equals("Folder"))
{
obj.OnDriveContentSelectionChange(currentSelection);
}
}

public void OnDriveContentSelectionChange(DriveContent currentFolder)
{

}
#endregion
If you look into the code mentioned above, you will notice that, OnDriveSelectionChange method takes a parameter of type Drive. We need this drive info to get the files and folders informations. Similarly, OnDriveContentSelectionChange takes DriveContent as a parameter. This will be require to fetch the files and subfolders details for the selected folder. These two methods we will not implement now, rather we will integrate it once our API calls are ready.
Implementing GetDriveInfo() method
Whoho!!! it’s the time to play with the APIs. In this step we will write some code to fetch all the drive informations of the local computer and add those into the collection.
To begin with this, first create an object of the “Scripting.FileSystemObject” from the AutomationFactory and set it in a local dynamic variable named “fileSystem”. As you read about the API documentation, there is a property called “Drives” which returns all the drives to you. Get the drive informations by calling fileSystem.Drives and set it in an different dynamic variable named “drives”.
Now once you have all the drives collection, just iterate through each of them and add a new instance of Drive object filled with VolumeName, DriveLetter, TotalSize, FreeSpace properties to the DriveCollection.
Here is the full code for retrieving the Drive info. Have a look into this.
private void GetDriveInfo()
{
dynamic fileSystem = AutomationFactory.CreateObject("Scripting.FileSystemObject");
dynamic drives = fileSystem.Drives;

foreach (var drive in drives)
{
try
{
DriveCollection.Add(new Drive
{
VolumeName = drive.VolumeName,
DriveLetter = drive.DriveLetter,
TotalSpace = drive.TotalSize,
FreeSpace = drive.FreeSpace
});
}
catch (COMException) { }
}
}
Once this step is done, you need to call the GetDriveInfo() method from the constructor or Loaded event of the MainPage class. If you run the application, you will see all the drives listed in the UI. The UI will look as below containing your drive list at the left side. In your case, the drive count will be different based on the drives available in your system.
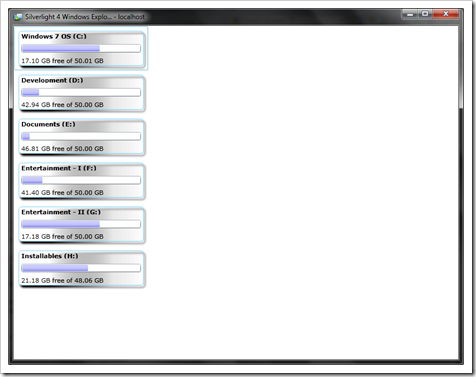
This will show you the Drive label along with the Drive letter as per the design we had done in the XAML page. The progress bar will show you the used space as you see in your Windows Explorer. The last line will show you how much space available in your drive and the total size of it.
Implementing GetFolders() method
Now, we will start working on retrieving the folders list. Just a minute. Here you have to do a trick. Let us discuss on the trick first, then we will move into the code. You can retrieve folders list in two way. One as your current drive and then the subfolders of your selected folder. To resolve this we will create some overloaded methods by creating different method signature for that. One will take Drive as parameter and the other will take DriveInfo as parameter. I am doing this thing so that, you can easily understand.
Now from the fileSystem we will get the folder by passing either the drive letter of the selected folder path based on the requirement. Then get the subfolders for it and pass it to a different method where we will take the folders as dynamic parameter. This method will be responsible for adding a new DriveContent instance to the DriveContent collection by setting the properties i.e. Name, Path and Type. In this case, type will be always “Folder”.
Let us see the code for the methods:
private void GetFolders(Drive currentDrive)
{
dynamic fileSystem = AutomationFactory.CreateObject("Scripting.FileSystemObject");
dynamic folders = fileSystem.GetFolder(string.Format(@"{0}:\",
currentDrive.DriveLetter)).SubFolders;

GetFolders(folders);
}

private void GetFolders(DriveContent currentSelection)
{
dynamic fileSystem = AutomationFactory.CreateObject("Scripting.FileSystemObject");
dynamic folders = fileSystem.GetFolder(string.Format(@"{0}",
currentSelection.Path)).SubFolders;

GetFolders(folders);
}

private void GetFolders(dynamic folders)
{
foreach (var folder in folders)
{
try
{
DriveContents.Add(new DriveContent
{
DriveContentName = folder.Name,
Path = folder.Path,
DriveContentType = "Folder"
});
}
catch (System.Exception) { }
}
}
Implementing GetFiles() method
It’s time to retrieve the files list available either in the drive or in the subfolder. The logic and trick behind this method implementation is same as the GetFolders() method. In this case, instead of getting the SubFolders we will retrieve the Files for the folder and pass it across the another method. That method will iterate through each record and them to the end of the DriveContent collection. This time we will chose “File” as the type of the content.
Here is the full code implementation for the GetFiles() method. Have a look into it.
private void GetFiles(Drive currentDrive)
{
dynamic fileSystem = AutomationFactory.CreateObject("Scripting.FileSystemObject");
dynamic files = fileSystem.GetFolder(string.Format(@"{0}:\",
currentDrive.DriveLetter)).Files;

GetFiles(files);
}

private void GetFiles(DriveContent currentSelection)
{
dynamic fileSystem = AutomationFactory.CreateObject("Scripting.FileSystemObject");
dynamic files = fileSystem.GetFolder(string.Format(@"{0}",
currentSelection.Path)).Files;

GetFiles(files);
}

private void GetFiles(dynamic files)
{
foreach (var file in files)
{
try
{
DriveContents.Add(new DriveContent
{
DriveContentName = file.Name,
DriveContentType = "File"
});
}
catch (System.Exception) { }
}
}
Integration of API calls to the page
It’s time to integrate the implemented methods in their proper positions. We already integrated the Drive loads at the beginning and once you run the application, the drives are populating in the left pane listbox. But selecting the drive is not doing anything.
Let’s start doing the integration part. First we will do the integration for showing the files and folders on drive selection change. Modify your OnDriveSelection() method with the following code snippet:
private void OnDriveSelectionChange(Drive currentDrive)
{
DriveContents.Clear();
GetFolders(currentDrive);
GetFiles(currentDrive);
}
Here, first thing we did is clearing all the contents of the DriveContents collection. Then we are retrieving the folders followed by files by giving call to the appropriate methods. This will add the list of folders at the top of the collection and then will add the files collection.
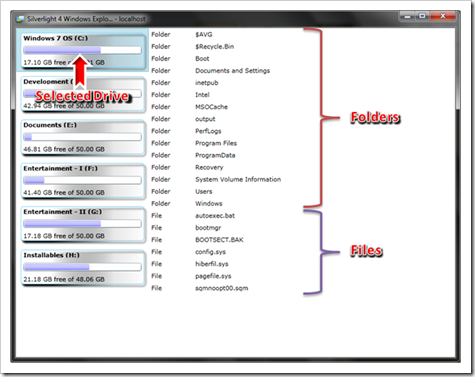
If you run your application now you will see only the Drives list in the UI. What happened!!! I think, this question is in your mind. Yes, correct. Only the drives list will be available in the window. Once you click on any drive, it will load the immediate files and folders in the right pane. If you select a different drive, it will refresh the right side ListBox with the files and folders respective to the selected drive.
Here is the screenshot of what you will see now. You will notice that the right side listbox has folders at the top and then the list of files. We called the methods in order to show them in this manner.
Now, clicking on the folders will have no effects. To achieve this, we need to integrate the methods to refresh the contents on drive content change. The implementation of the logic will be as same as the previous one. Only difference here will be instead of passing the Drive we will pass the current folder as DriveContent. This will clear the DriveContents and then refresh the folders list first followed by the files list.
Here is the code for that:
public void OnDriveContentSelectionChange(DriveContent currentFolder)
{
DriveContents.Clear();
GetFolders(currentFolder);
GetFiles(currentFolder);
}
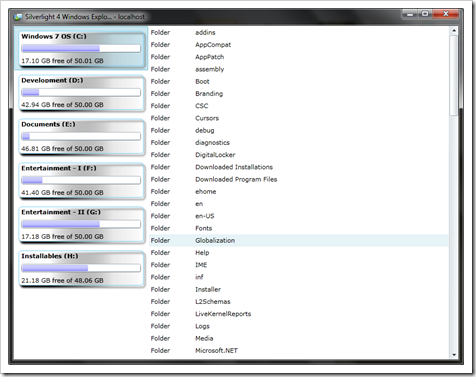
Once you run the application and click on any folder present in the right pane, it will refresh the ListBox with the subfolders and files.
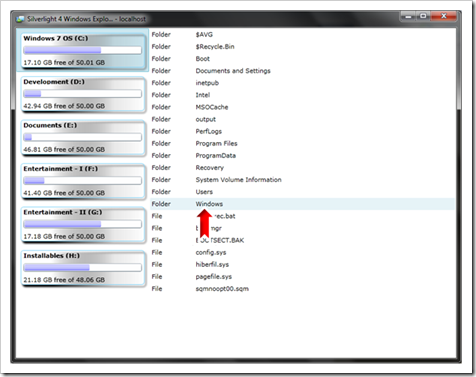
You can browse through as many subfolders as you can and you will see the same result. Select a different drive and browse through the contents of the drives, folders and their subfolders.
What Next?
That’s all about the implementation part of accessing the local resources using Silverlight 4 COM Interoperability. Hope, you really enjoyed this article and learnt a lot about it. As a note, I want to say that, in each step I created the FileSystemObject which you can easily remove from each method and put it as a single instance in a member variable. I used it in all the places just to describe you what needs to done.
Another note from me is, you can also execute any file from that list. So, it will open up the files once you want to execute directly from your Silverlight OOB application. I will write another article to describe it in depth. Till then enjoy learning new new functionalities using Silverlight 4.
Download
End Note
You can download my source code attached with this article and run in your PC to see exactly what is going on there. Read it, understand and apply the thought in your application development.
Last but not least, Don’t forget to Vote for the Article and provide your feedbacks and suggestion. This way I can improve my next articles and provide you more knowledge.


