SCANPST.EXE is a Inbox Repair Tool for Microsoft Outlook to diagnose and repair errors in Outlook data file. If your Microsoft Outlook Data File (.pst and .ost) won’t open or if you suspect the file has been corrupted, use this tool to repair the file.
In this blog post, we will discuss how to repair the data files associated in your Microsoft Outlook client. Continue reading to learn about it.

When you realize that, your Outlook data file (.pst or .ost) file has been corrupted or running very slow, you may want to scan your PST for errors. The 'Microsoft Outlook Inbox Repair Tool' i.e. the SCANPST.EXE file helps you to easily diagnose the errors and fix them.
To get started with the tool, first you need to close Outlook and wait for few moments until the application completely exits. You can check the System Tray and make sure that the Outlook icon has been disappeared.
Now go to 'Start' and search for 'scanpst'. The file is generally available in the following path:
- For Outlook 2007 - '%ProgramFiles%\Microsoft Office\Office12'
- For Outlook 2010 - '%ProgramFiles%\Microsoft Office\Office14'
- For Outlook 2013 - '%ProgramFiles%\Microsoft Office\Office15'
- For Outlook 2016 - '%ProgramFiles%\Microsoft Office\root\Office16'
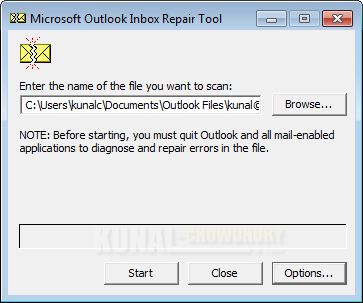
Once you open the SCANPST.EXE file, the following Window will launch where you need to enter the name of the data file that you want to scan. By default, it automatically points to the default PST that you have configured in Outlook. In case you want to change it, click 'Browse...' to select the correct data file.
The Inbox Repair tool doesn't connect or analyze any data stored in an Exchange mailbox. If you're using a Microsoft Exchange account and your offline Outlook Data File (.ost) has been damaged, you can safely delete the file. Outlook will recreate it the next time the application opens.

When you are ready to begin the process, click on 'Start'. This will start the scanning process to check for file errors. Stay calm until the process ends. It will take couple of minutes to complete.

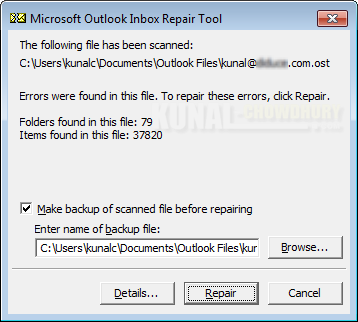
Once the scanning process completes, it will show you the following window with the report. If it finds any errors, it will list no. of such occurrences. You can click 'Details...' to more about the errors. Click on 'Repair' button to fix the errors that it identifies. Make sure to check the 'Make backup of scanned file before repairing' to create a backup copy of the data file before it begins with fixing it.

At the end, it will show you a success message. Now start Outlook with the profile associated with the Outlook Data File you just repaired. If you have multiple data files, you may want to repair each one of them. Just follow the above steps for each one of the Outlook data files.


