How to create Schedule Task in Universal Windows apps?
Schedule tasks are often require to do some clean ups, fetch some records from internet and/or update the live tile/lock screen. There might...- Article authored by Kunal Chowdhury on .
Schedule tasks are often require to do some clean ups, fetch some records from internet and/or update the live tile/lock screen. There might...- Article authored by Kunal Chowdhury on .
 Schedule tasks are often require to do some clean ups, fetch some records from internet and/or update the live tile/lock screen. There might be some other requirements too. If you want to add schedule tasks in your Windows and/or Windows Phone runtime apps, here you go.
In this post, let’s keep it generic and learn, how to create schedule task in universal windows apps. At the end, share your feedback to improve. Don’t forget to share in your network.

Windows runtime apps are great when you are building apps for both Windows and Windows Phone using the common shared template called Windows Universal Apps. If you are building applications/games targeting universal apps, this post will help you to schedule some tasks on your need, whatever that is!
Assuming you already have created a Universal Windows Apps project, I am going further to discuss how to add the task scheduling onto it.
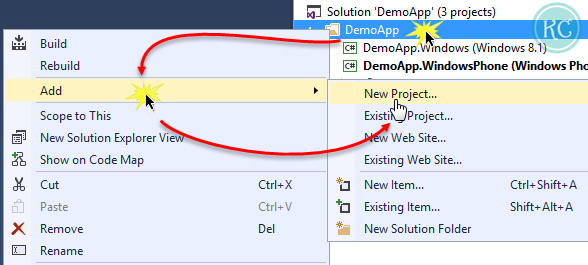
First of all, you have to create a new project of template type “Windows Runtime Component”. To do this, right click on your project solution or the app folder within Visual Studio IDE (as shown above) –>Click “Add” from the context menu –> Click “New Project”. This will open the “Add New Project” dialog window in the screen.
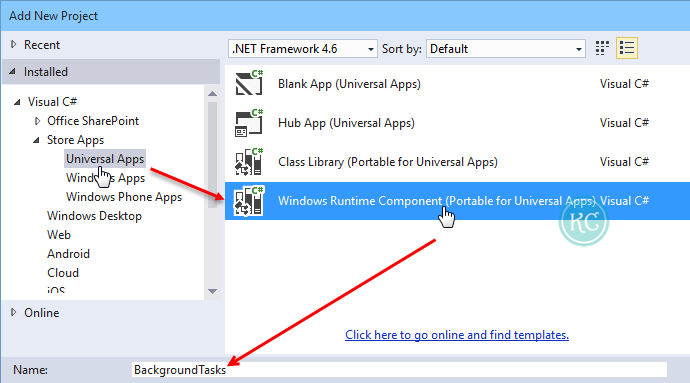
As shown above, navigate to Installed –> Visual C# (or the programming language type that you are using) –> Store Apps –> Universal Apps in the left panel. In the right panel, select the project template that labels “Windows Runtime Component (Portable for Universal Apps)”. Give it a name e.g. “BackgroundTasks” and hit enter.
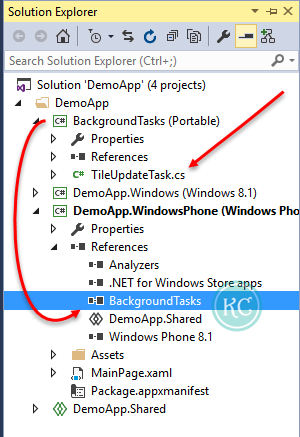
This will create a new project in your application solution. As it is a portable class library, you can use it in both Windows and Windows Phone application as a reference.
In the project, you will see a default class named “Class1”. Rename it to give a proper meaning. For example, we will rename it as “TileUpdateTask.cs”.
Now add the portable class library reference in your main projects. That could be either Windows project, Windows Phone project or both.
Once you are done with this, we need to add a declaration to the app so that, it can recognize of a background task. Once you add that, your app will run app code even when the app is submitted.
Remember that, background tasks are intended for small work items that require no interaction with the user.
Also remember that, if you want multiple background tasks to run in your app or game, you can add multiple declarations in the Package.appxmanifest XML file.
To do this, open Package.appxmanifest file –> Navigate to “Declarations” tab. Now from the “Available Declarations” panel, select “Background Tasks” and click the “Add” button. This will add it in the supported declarations section. Now in the right side panel, you need to set few properties and settings. In the “Properties” section, there are many supported task types for background tasks. They are “Audio”, “Chat message notification”, “Device use trigger”, “Location”, “Push notification”, “System event” and “Timer”. Select one or more option from the list.
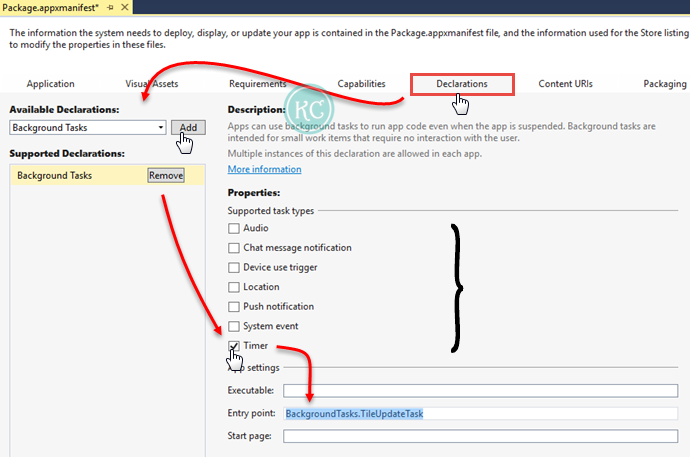
Now in the “App Settings” panel, set the entry point of the background task. In our case, it is: “BackgroundTasks.TileUpdateTask”, where “BackgroundTasks.TileUpdateTask” is the fully qualified name of the class which will be executed.
Now the next step is to register the background task in your phone. To do this, Open your xaml.cs page where you want it to register. Override the OnNavigatedTo method and register the background task.
Below is the typical code snippet to register your background task as part of your app/game. Before registering the task, you need to call “BackgroundExecutionManager.RequestAccessAsync()”. On Windows, this method presents the user with a dialog box that requests the app can be added to the lock screen. But on Windows Phone, it is little different. This method does not prompt the user here, but this must be called before registering any background tasks.
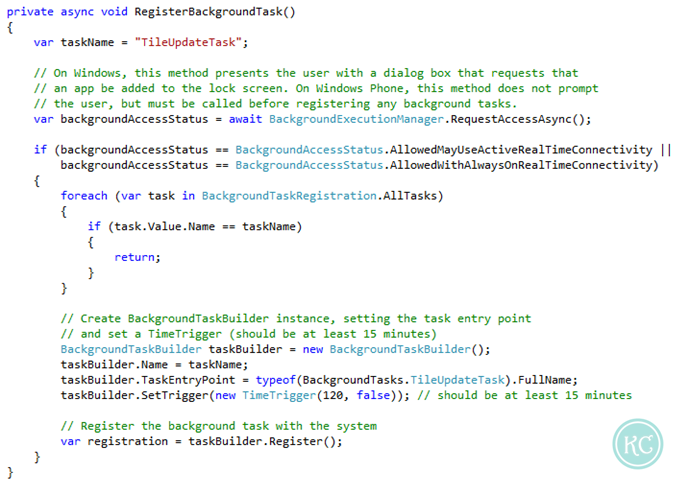
At the end, create an instance of BackgroundTaskBuilder class, set a identifiable name to it, set the entry point to the fully qualified class name that we added in the Package.appxmanifest file’s declaration page. Set the trigger for the task that you specified in the declaration page. In our case, we selected “Timer” and hence we will create a TimeTrigger here with a value more than 15 minutes. Remember that, a TimeTrigger value must be more than or equal to 15 minutes. If you specify less than 15 minutes, it will throw exception at runtime. Now call the Register() method on BackgroundTaskBuilder object to register it.
Finally you will need to implement the background task. Open the code file (in our case, it is: TileUpdateTask.cs in the portal class library project) and implement IBackgroundTask interface, which defines a method named “Run”.
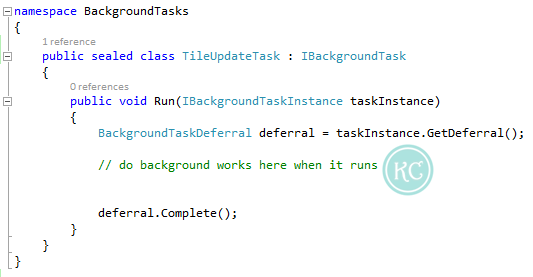
In the run method, call the GetDeferral() on background task instance that passed as a parameter to the Run method. Then write your code and at the end, call deferal.Complete(). This will make sure that, your application will run even if you are calling any asynchronous method from the background task.
Hope, you like this post. Don’t forget to drop a line below and share your feedback. Any queries in implementation? Drop your comment here and I will try to respond as soon as possible. In the next post, we will learn how to update a tile from a scheduled task that we created just now. Till then happy coding.
Connect with me over Twitter, Facebook, Google+ to get the updates that I share over those social networking sites. Subscribe to my blog’s RSS feed and email newsletter to get the immediate notification of new blog post in your inbox.
Thank you for visiting our website!
We value your engagement and would love to hear your thoughts. Don't forget to leave a comment below to share your feedback, opinions, or questions.
We believe in fostering an interactive and inclusive community, and your comments play a crucial role in creating that environment.