If you are using OneDrive on your PC and if you capture a lot of screenshots, this question may I arise whether you can automatically save the screenshots as a file to your OneDrive account. The answer is 'Yes'. You can save the screenshots directly to OneDrive.
In this quick tips, let's learn how to save the captured screenshots on Windows 10 automatically to the connected OneDrive account.

OneDrive (previously known as SkyDrive) is a file hosting service operated by Microsoft, which allows users to store files as well as other personal data in users cloud storage. It offers 5 GB of storage space free of charge and additional storage can be added on demand. If you don't have OneDrive account, you can click here and claim your free 5GB online storage.
Is there any limitations saving screenshots to OneDrive?
There are some restrictions set by Microsoft in order to save screenshots to OneDrive account. Make sure that the image size of less than 10 GB and is not violating any terms. Also, make sure that you are not infringing other works. That includes sharing of copyrighted music or other copyrighted material, resale or other distribution of Bing maps or photographs etc.
How to save screenshots to OneDrive automatically?
Perform the below mentioned steps to change the OneDrive settings to automatically save screenshots to OneDrive account:
- Before starting, make sure that you have installed the OneDrive client on your PC and signed-in to the OneDrive client.
- Right-click on the OneDrive icon in the notification area. A menu will popup on the screen.
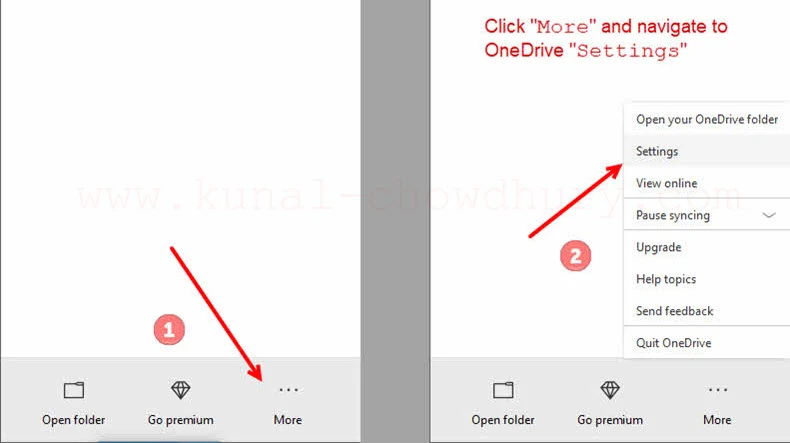
- Click on More | Settings to open the OneDrive settings page.

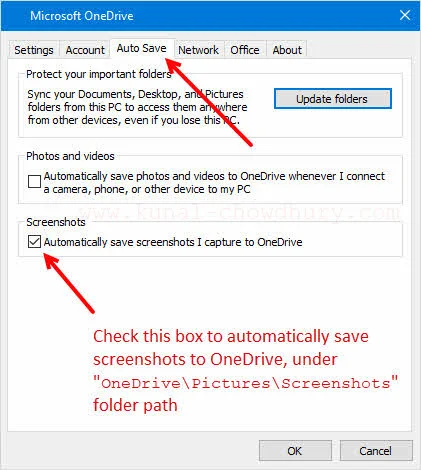
- Now click on the Auto Save tab and select the option Automatically save screenshots I capture to OneDrive.

- Click OK to save the changes.
Now whenever you take a screenshot on your Windows 10 desktop, using the Print Screen keyboard shortcut, you will see a notification from OneDrive client that the captured screenshot has been saved to OneDrive. You can find the screenshot at the below location: OneDrive\Pictures\Screenshots inside your OneDrive path.
You may also like to read how to enable OneDrive's folder protection feature on Windows 10.
Can I access the saved screenshots from any device?
Absolutely! If you are connected to online on the system where you are taking the screenshot and the OneDrive is already configured properly, based on your internet bandwidth and the file size it will automatically backup the file to cloud. Once it is synced to OneDrive cloud, you can access them from anywhere.
How can I retrieve the media saved to OneDrive?
Once the screenshots saved to OneDrive and synced, you can easily get those by navigating to OneDrive web from any PC or mobile devices. If you have OneDrive client configured to your system, you can get the screenshots at the following path: OneDrive\Pictures\Screenshots.


