 If you are a web developer and use Visual Studio to design and develop web applications, this post will help you to improve your productivity. Last year we discussed how to improve your productivity using the “Default Browser Switcher Extension” in Visual Studio 2010.
Now here comes another post which will show you how to use the in-built “Browser Switcher” extension available in Visual Studio 2012. I hope that, once you start working in Visual Studio 2012, this will definitely help you to increase your productivity.
What is Browser Switcher Extension?
Let us discuss this in a different way. You as a web developer might faced some issues while building and testing your web application. Your web application should be tested in various browsers for various layout issues before you freeze working on that part and that stuff is very pathetic. Either you have to open various browsers and paste the URL to check for layout issues or you have to open individual browsers to set them as default browser before running the app in debug mode. The first scenario is pretty easy if you are not running the app attached with the Visual Studio debugger.

Now come to the browser switcher extension. This helps you to set the default browser within the Visual Studio IDE itself to run your application in that browser window without effecting the actual browser settings.
Last year I posted “Default Browser Switcher Extension for Visual Studio 2010 - Improve Productivity” which helped many of you to improve your productivity stuffs while building and testing your apps in different browser. If you are working in Visual Studio 2010, read that post. Continue reading to know about the browser switcher plugin in Visual Studio 2012.
How to use Browser Switcher in Visual Studio 2012?
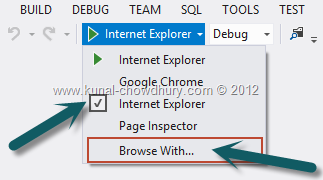
Unlike Visual Studio 2010, you don’t have to install the Default Browser Switcher extension in Visual Studio 2012. It comes with the browser switching functionality in-built with the new IDE. You can directly access it from the debugger tool. Check out the following screenshot to know where you can get it:

By default, the default browser is “Internet Explorer”. If you want to run your web application in other browser installed in your PC, just click the small arrow head to open the below menu, which lists the installed browsers integrated to the IDE:

If you don’t see the installed browser listed in the browser chooser menu, you can add it there by clicking the “Browse With…” menu item as shown above.
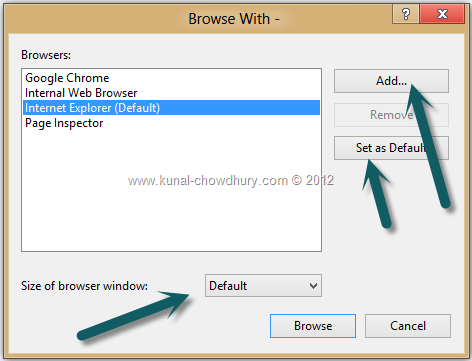
Once you click the “Browse With…” menu item, the following dialog will popup in the screen, where you will be able to add, remove installed browser and also set a browser as the default one:

Now once you add the new browser in the Visual Studio 2012 IDE, you will be able to see it in the browser chooser menu and you will be able to debug your web application with that browser directly from the Visual Studio IDE.
I hope that this blog post will be helpful for you to build and test your web application in various browsers to check out the layouts and functionality. Stay tuned to my blog to get article updates in coming days. Also connect with me on Twitter, Facebook to get regular updates. Subscribe to my blog’s RSS Feed and Email Newsletter for immediate update.
CodeProject


 If you are a web developer and use Visual Studio to design and develop web applications, this post will help you to improve your productivity. Last year we discussed how to improve your productivity using the “


