How to use PlaySoundAction Behavior in WP7 Application?
Behaviors are most demanded feature to include in Silverlight, Windows Phone 7 and/or WPF applications to implement proper MVVM pattern to d...- Article authored by Kunal Chowdhury on .
Behaviors are most demanded feature to include in Silverlight, Windows Phone 7 and/or WPF applications to implement proper MVVM pattern to d...- Article authored by Kunal Chowdhury on .
Behaviors are most demanded feature to include in Silverlight, Windows Phone 7 and/or WPF applications to implement proper MVVM pattern to do some UI level actions. These are pluggable on demand and don’t need any other extra code to integrate. Just a simple XAML change and you are done.
In this article, we will learn how to use the inbuilt “PlaySoundAction” behavior to add sound effect on button click. We will demonstrate it using Windows Phone 7 application. Read more to learn. Complete demonstration with images for each steps available.
Let us start with the application UI design. Let’s go with some buttons in the UI to give you out a simple briefing while demonstrating. First of all, we will convert the Grid named “ContentPanel” to a Stackpanel and insert some button controls as shown below:
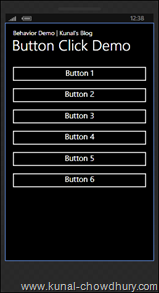
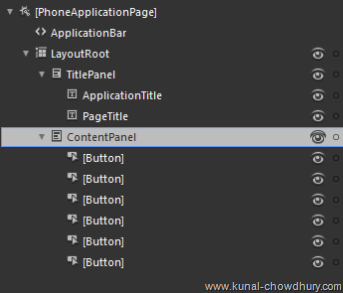
In the second image, you will get to know how the XAML UI has been structured. No need to discuss more on the design. Here is the XAML code that we had modified just now for our demo:
<!--LayoutRoot is the root grid where all page content is placed-->
<Grid x:Name="LayoutRoot" Background="Transparent">
<Grid.RowDefinitions>
<RowDefinition Height="Auto"/>
<RowDefinition Height="*"/>
</Grid.RowDefinitions>
<!--TitlePanel contains the name of the application and page title-->
<StackPanel x:Name="TitlePanel" Grid.Row="0" Margin="12,17,0,28">
<TextBlock x:Name="ApplicationTitle" Text="Behavior Demo | Kunal's Blog"
Style="{StaticResource PhoneTextNormalStyle}"/>
<TextBlock x:Name="PageTitle" Text="Button Click Demo" Margin="9,-7,0,0"
Style="{StaticResource PhoneTextTitle1Style}" FontSize="48"/>
</StackPanel>
<StackPanel x:Name="ContentPanel" Margin="12,0,12,0" Grid.Row="1" >
<Button Content="Button 1"/>
<Button Content="Button 2"/>
<Button Content="Button 3"/>
<Button Content="Button 4"/>
<Button Content="Button 5"/>
<Button Content="Button 6"/>
</StackPanel>
</Grid>
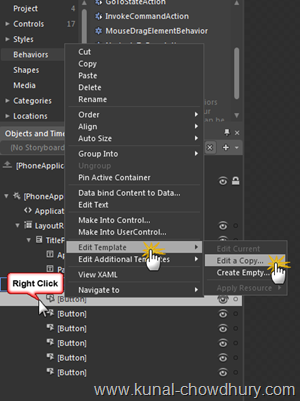
Once the UI is ready, let us edit the button template. As shown below, right click on any of the button control in the Objects and Timeline panel. From the popped up context menu, select “Edit Template” and then “Edit a Copy…”.
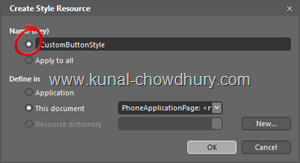
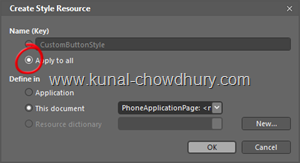
From the next dialog window that pops up in the screen, either chose a named Style or a generic style which will apply to all the button controls available in the screen or application. Let us do it for all button controls.
Select “Apply to all” and click “OK” to continue:
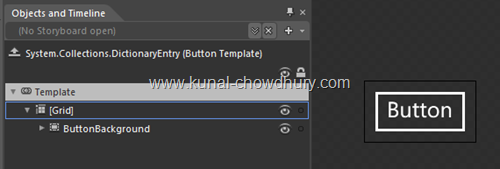
You will now see the below template structure of the button control:
Go to “States” tab and click on the “Pressed” state as shown below:
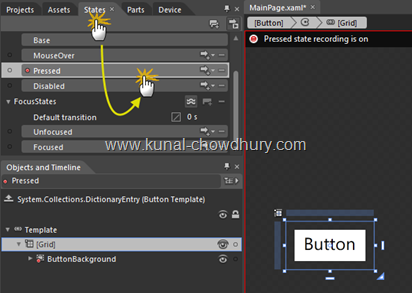
This will change the state to recording more. Now go to the “Assets” tab as shown below and click the “Behaviors” item from the left panel. This will load the behaviors available in the system. Search for “PlaySoundAction” behavior.
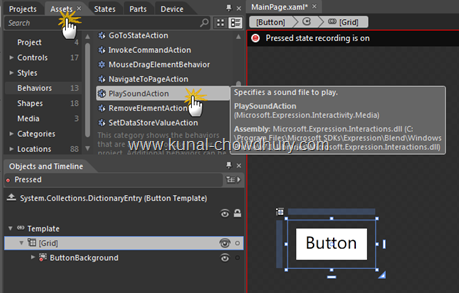
Select the root Grid tag of the template and drag the behavior to that Grid.
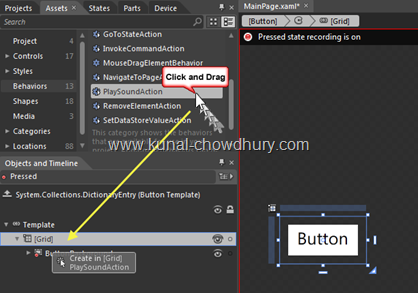
From the properties panel select the sound file as shown below (make sure that, you included the sound file in the solution and built it once before coming to this screen.

Here is the complete generated XAML code for your reference:
<Style TargetType="Button">
<Setter Property="Background" Value="Transparent"/>
<Setter Property="BorderBrush" Value="{StaticResource PhoneForegroundBrush}"/>
<Setter Property="Foreground" Value="{StaticResource PhoneForegroundBrush}"/>
<Setter Property="BorderThickness" Value="{StaticResource PhoneBorderThickness}"/>
<Setter Property="FontFamily" Value="{StaticResource PhoneFontFamilySemiBold}"/>
<Setter Property="FontSize" Value="{StaticResource PhoneFontSizeMediumLarge}"/>
<Setter Property="Padding" Value="10,3,10,5"/>
<Setter Property="Template">
<Setter.Value>
<ControlTemplate TargetType="Button">
<Grid Background="Transparent">
<i:Interaction.Triggers>
<i:EventTrigger EventName="MouseLeftButtonDown">
<eim:PlaySoundAction Source="/Sounds/click.wav" Volume="1"/>
</i:EventTrigger>
</i:Interaction.Triggers>
<VisualStateManager.VisualStateGroups>
<VisualStateGroup x:Name="CommonStates">
<VisualState x:Name="Normal"/>
<VisualState x:Name="MouseOver"/>
<VisualState x:Name="Pressed">
<Storyboard>
<ObjectAnimationUsingKeyFrames
Storyboard.TargetProperty="Foreground"
Storyboard.TargetName="ContentContainer">
<DiscreteObjectKeyFrame KeyTime="0"
Value="{StaticResource PhoneBackgroundBrush}"/>
</ObjectAnimationUsingKeyFrames>
<ObjectAnimationUsingKeyFrames
Storyboard.TargetProperty="Background"
Storyboard.TargetName="ButtonBackground">
<DiscreteObjectKeyFrame
KeyTime="0" Value="{StaticResource PhoneForegroundBrush}"/>
</ObjectAnimationUsingKeyFrames>
<ObjectAnimationUsingKeyFrames
Storyboard.TargetProperty="BorderBrush"
Storyboard.TargetName="ButtonBackground">
<DiscreteObjectKeyFrame
KeyTime="0" Value="{StaticResource PhoneForegroundBrush}"/>
</ObjectAnimationUsingKeyFrames>
</Storyboard>
</VisualState>
<VisualState x:Name="Disabled">
<Storyboard>
<ObjectAnimationUsingKeyFrames
Storyboard.TargetProperty="Foreground"
Storyboard.TargetName="ContentContainer">
<DiscreteObjectKeyFrame
KeyTime="0" Value="{StaticResource PhoneDisabledBrush}"/>
</ObjectAnimationUsingKeyFrames>
<ObjectAnimationUsingKeyFrames
Storyboard.TargetProperty="BorderBrush"
Storyboard.TargetName="ButtonBackground">
<DiscreteObjectKeyFrame
KeyTime="0" Value="{StaticResource PhoneDisabledBrush}"/>
</ObjectAnimationUsingKeyFrames>
<ObjectAnimationUsingKeyFrames
Storyboard.TargetProperty="Background"
Storyboard.TargetName="ButtonBackground">
<DiscreteObjectKeyFrame
KeyTime="0" Value="Transparent"/>
</ObjectAnimationUsingKeyFrames>
</Storyboard>
</VisualState>
</VisualStateGroup>
</VisualStateManager.VisualStateGroups>
<Border x:Name="ButtonBackground" BorderBrush="{TemplateBinding BorderBrush}"
BorderThickness="{TemplateBinding BorderThickness}"
Background="{TemplateBinding Background}" CornerRadius="0"
Margin="{StaticResource PhoneTouchTargetOverhang}">
<ContentControl x:Name="ContentContainer"
ContentTemplate="{TemplateBinding ContentTemplate}"
Content="{TemplateBinding Content}"
Foreground="{TemplateBinding Foreground}"
HorizontalContentAlignment="{TemplateBinding HorizontalContentAlignment}"
Padding="{TemplateBinding Padding}"
VerticalContentAlignment="{TemplateBinding VerticalContentAlignment}"/>
</Border>
</Grid>
</ControlTemplate>
</Setter.Value>
</Setter>
</Style>
Hope this post was helpful for you to understand the behavior. “PlaySoundAction” comes by default for Windows Phone 7. If you want to play any sound file, you can easily use this behavior instead of writing a huge lines of code. This will also make sure that, you are following proper MVVM pattern.
Let me know, in case you need further information on this. Feedbacks are always welcome. Post your queries below, if you have. I will try to answer you as soon as possible.
Thanks for following my blog. If you are in Facebook, you may want to “Like” my Facebook Page. I am also available in Twitter @kunal2383.
Thank you for visiting our website!
We value your engagement and would love to hear your thoughts. Don't forget to leave a comment below to share your feedback, opinions, or questions.
We believe in fostering an interactive and inclusive community, and your comments play a crucial role in creating that environment.