Sometime it happens with most of us when Visual Studio stops showing the intellisense menu. Most of the time it happens when the license of some Visual Studio plugin expires or when you uninstall any productivity plugins like ReSharper. It makes you annoyed to think what is the root cause here.
If you faced similar issue in your Visual Studio IDE and unable to bring back the beloved intellisense menu, here is the solution for you.
This is a common issue that the developer faces after the productivity plugin license expires or the developer uninstalls to install a new set of tool. Then the developer stars breaking the head to identify what’s the issue with the tool/plugin which caused the issue. Let me tell you that, this is not due to the installation of new plugin but with the older plugin that you just uninstalled or expired. That could be a Visual Studio bug too.
As most of us are already familiar with the intellisense menu inside Visual Studio to speed up the work, this definitely creates problem writing code. So, what needs to be done to bring back the same? To bring back the Visual Studio Intellisense, just follow the below simple steps:
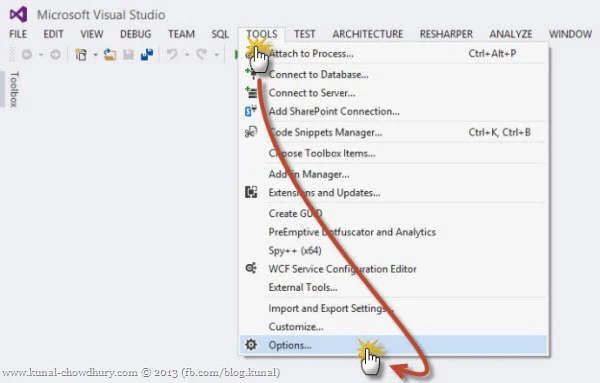
- Open the Visual Studio Options dialog by navigating to Tools -> Options

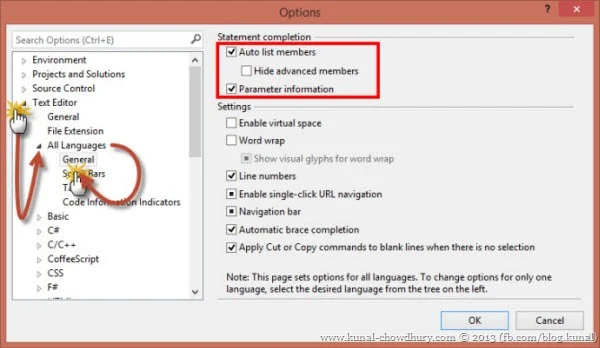
- Navigate to Text Editor -> All Languages -> General tab item as shown below, where you will find two checkboxes named “Auto list members” and “Parameter information”:

- If those two checkboxes are either unchecked or filled, click them until they change their state to checked as shown in the above screenshot.
That’s all! Now just click “OK” to come back to Visual Studio and test it in any code editor screen. You will notice that the intellisense menu is working again like the one you wanted to see. I hope that this small post will help you when you face this issue. Just remember the trick or bookmark it for future and apply the trick whenever you face the intellisense issue in future. Happy coding.


